Quantcast
Channel: KEH Camera Blog
Viewing all 304 articles
Browse latest View live

KEH's Most Wanted

$
0
0
Featured below are a selection of KEH Camera's "most wanted" bodies, lenses and accessories.  We are actively looking to purchase these items, so if you have them, we want to buy them!


The lens pictured is a 45-90 f4.5 Vario-Sonnar T*, but we are actively seeking all Contax 645 auto focus zoom & fixed focal length lenses.


The finder pictured is an MF-2 waist level finder, but we are actively seeking all Contax 645 auto focus finders.


In addition to the Fuji GA645I Pro 60 f4 camera pictured, we are also actively seeking several other Fuji medium format cameras.  Please see below for a complete list.


In addition to the Rolleiflex 2.8 GX camera pictured, we are also actively seeking several other Rollei cameras.  Please see below for a complete list.


In addition to the Widelux F8 camera, we are also actively seeking the Widelux F7 panoramic camera. 


In addition to the Yashica Mat 124, we are also actively seeking the Yashica Mat 124G camera.

As well as the photographic equipment featured above, we are also looking to purchase the following gear:

* 4x5 Wooden Field Cameras (Late Models)

* Fuji GA645S Pro 45 f4 Medium Format Fixed Lens Camera

Fuji GA645W or WI Pro 45 f4 Medium Format Fixed Lens Camera

Fuji GF670 80 f3.5 Medium Format Fixed Lens Camera

Fuji GL690 100 f3.5 Medium Format Fixed Lens Camera

Fuji GSW690III Pro 65 f5.6 Medium Format Fixed Lens Camera

Fuji GW680III 90 f3.5 Medium Format Fixed Lens Camera

* NPC 195 Rangefinder Camera

* Polaroid 180 Land Camera

* Polaroid 195 Land Camera

* Polaroid 600 SE Camera

* Rolleiflex 2.8 E3 TLR Manual Focus Fixed Lens Camera w/ Waist Level

* Rolleiflex 2.8 E2 TLR Manual Focus Fixed Lens Camera w/ Waist Level

* Rolleiflex 2.8 F TLR Manual Focus Fixed Lens Camera w/ Waist Level

* Rolleiflex 2.8 FX TLR Manual Focus Fixed Lens Camera w/ Waist Level

* Rolleiflex 3.5 F TLR Manual Focus Fixed Lens Camera w/ Waist Level

* Rolleiwide TLR Manual Focus Fixed Lens Camera w/ Waist Level

* Telerollei TLR Manual Focus Fixed Lens Camera w/ Waist Level

To sell any of the above featured items (or if you have other gear you'd like to sell), please call us at (770) 333-4220 or (800) 342-5534.  We are currently offering top market value for your clean, used gear.  As a bonus, if you send us your equipment, we'll pay for shipping!  Turnaround time is typically 24-48 hours once your equipment arrives in-house.  Once you approve our offer, we'll send you a check.  It's that easy!

Don't Forget Photos of Your Own Loved Ones

$
0
0
A few years ago I experienced an epic hard drive failure. It was just before external hard drives held huge capacities and were easily connected. So, I sat there staring at a smoking drive while it whizzed and clicked, knowing nothing was backed up. The sticker shock of a full on recovery was quickly forgotten as soon as I had all my data back in my hands. It had taken about 8 months of regular payments for us to get it back, so as soon as I did, I immediately plugged it right into my CPU and listened to it come to life with a healthy “whir” that could only mean I’d soon be previewing gigabyte after gigabyte of my family photos.

I scanned through each folder: Lola’s birth, Mother's Day 2008, Zoe's fifth birthday. It was an amazing feeling, but the more folders I went through, the more I wondered where all my images were, until I realized the truth- all the normal, everyday images of my family life I had assumed were there, just didn't exist because they had never been taken.


When you're a photographer you're always working. You see the world in frames, and for me at least, that meant I started putting the camera down when I was with my family. It would only come out on those big occasions that marked time like a metronome. And as I sat in there weeding through a glow of images, all I wanted to see was something normal: Breakfast, a messy syrup-covered face, bath time on a Tuesday night, maybe even a tantrum.


It was this experience, along with a section in Jonathan Canlas' book Film is Not Dead, that helped me realize that I have a responsibility to myself and to my family, to capture them just like I would any client, if not more so. This means being intentional. It means budgeting time, and with your less-camera-friendly family members, it means being accommodating. It also means that your responsibility goes beyond the photo taking. If you are going to capture your family in the right way, then you need to be making prints and books. Digital files are not photos, they’re files. Make prints, send them to people, watch their faces light up when they look at a picture of their grandkids or themselves even. Making time for all of this is not easy, but it is worth it.


Here are a few things that I’ve learned along the way:

• Set a goal. I work better on time, so my current goal is once a season to let my daughters wear whatever they want and give them a personalized mini-session. My ultimate goal is to do this once a month.

• Forget the location. A session doesn't need to be hours long, and if you make it shorter, then you might have people wanting to get their picture taken more often. Some of my favorite portraits of my father were at a holiday party where I pulled him aside and shot a roll of him up against a blank interior wall.

• Educate your loved ones. We let our girls use all of our gear to take pictures of us. It gets them excited about photography, and shows them and the rest of our family that we're not afraid to get our pictures taken too.

• Hide the bad photos. I never delete bad images or destroy negatives, but I will hide most crooked smiles and double chins. No one is going to want to let you take their picture again if they hate the way they look in everyone of them.  Capturing real life is beautiful, even when its not flattering, but I wouldn’t push this point at the expense of a family member’s feeling.

For me, the process of capturing my family and cataloging life is always evolving, it has to be. My dedication level is not where I want it to be, but I can tell that with some small steps, I’m getting closer. I know in the years ahead I’ll thank myself when I can look back and see time stopped, if even for a little while.


Contributor Bio: Matthew Novak is a Photographer & Designer based just outside of Manhattan. He is half of the husband and wife photography team Tin Sparrow Studio and a freelance tablet designer at Bon Appétit. 

Website (personal and film work)http://mtthwnvk.com/ 


Matthew previously contributed to the KEH Blog with One Photographers Take on Running a Photo Business with Your Spouse. Be sure to check it out also!


A Brief Lesson on the Origins of Photography

$
0
0
Many photographers may have never taken the time to study the birth and roots of the beautiful, surprising, challenging, and artistic medium that is photography. When we take a glance back in time, we find several innovative trailblazers who have the same general goal: to document or record the world around them.

Imagine sitting among the group of modern thinkers that is the French Academie des Sciences in Paris, France. The year is 1839, January 7th to be precise, and something astonishing, even magical, is about to be displayed for the first time in this group of innovators. A crowd of bystanders gathers, surprised and enchanted by the invention they see. Louis Jacques Mande Daguerre, a respected artist in several mediums, stands and demonstrates his latest work process. "Daguerreotypes," as he calls them, are unique and detailed lifelike visual representations printed on copper. They are unlike anything seen prior to right now. They are the predecessors of the modern photograph. How did he do it? Are there others who have invested time and thought in this genius method of work?

The truth is, Daguerre had been working on his daguerreotypes for the last almost-twenty years. The idea crossed his mind while working with his Camera Obscura. A Camera Obscura was a tool widely used by artists or architects to project an image in order to trace it and create accurate drawings or sketches of the environment in which they stood. Many of them were wooden boxes with a small opening or lens on one side and a mirror inside to reflect a right-side-up view of the world on the back wall of the box where the master sketcher would tack paper and begin tracing.
Diagram of a man using a Camera Obscura to make a drawing

Daguerre wanted to create a way to make that projected image permanent. And he wasn't the only one. Joseph Nicephore Niepce, a French thinker, shared Daguerre’s curiosities and became his aid in finding appropriate chemistry for making these permanent images. Niepce had some prior small successes around 1826 dabbling with scientific materials. Daguerre worked with him from 1829 until Niepce passed away in 1833. At the same time, an Englishman by the name of William Henry Fox Talbot who knew nothing of Daguerre's fascination or method was struggling with very similar frustrations. As a man who enjoyed drawing in his sketchbook, Talbot says this of his work with the Camera Obscura, "the inimitable beauty of the pictures of nature's painting which the glass lens of the Camera throws upon the paper in its focus- fairy pictures, creations of a moment, and destined as rapidly to fade away.... how charming it would be if it were possible to cause these natural images to imprint themselves durably, and remain fixed upon the paper. And why should it not be possible?"*
Louis Jacques Mande Daguerre, Still Life, 1837. Daguerreotype. 
So, as Talbot began experimenting with his own chemistry, in 1834 he found that a salt-coated paper painted with silver nitrate turned a dark color when left in the sun. He then began pressing botanical samples of foliage and leaves against these coated sheets of paper and leaving them out in the sun. This created beautiful likenesses of the specimens. Talbot called the process "the art of photogenic drawing."

William Henry Fox Talbot, Asparagus Foliage, early 1840s, Photogenic Drawing Negative

As Henry Fox Talbot's methods advanced, he came full circle to the idea of using the Camera Obscura to create these works and in 1835 he made silhouette-like images of the houses and nature in his surroundings. All the while, Daguerre was in France perfecting his process and making strides in the chemical processes that him and Niepce had slaved over together. Daguerre polished plates of copper and sensitized them with a layer of silver and iodine fumes. He, similar to Talbot, used large camera boxes to expose the copper plates to light. The box captured and projected an image onto the copper plate. He would then expose the copper plate with mercury. He even discovered that salt water would fix the image to establish permanence. Daguerre announced and demonstrated his process openly for the French Academy of Science on that day of January 7th in 1839 and patented the tools one would need to create daguerreotypes of their own.


So, when Talbot in England, learned of Daguerre's announcement of invention in France, he tried to stake a claim in the invention of his own unique process. Talbot presented his methods before the Royal Society of England later in February of the same year. His announcement of these "photogenic drawings" was a break-through in recording and studying items via direct contact. [The photogenic drawing later evolved into the calotype or Talbotype.]

Daguerre on left, Talbot on right
Both men spent the rest of their lives devoted to developing these processes and coining new and useful ones. They are both widely considered founding fathers of the modern photographic process. From its origins, photography has been used as a method of useful and scientific recording of data, as well as its own art form.


* Source: The Metropolitan Museum of Art. “William Henry Fox Talbot (1800-1877) and the Invention of Photography.”


- Kelly Latos

Why I Love Being a Second Shooter

$
0
0
It seems that most wedding photographers want to have their own business, calling the shots (literally), and taking on every wedding as the front man. In my past three and a half years of wedding photography, I’ve come to find myself in being a second shooter and found myself loving it more than shooting my own weddings.


In being a wedding photographer’s assistant or second shooter, it is my job to make sure the main photographer has the easiest day possible. I carry any equipment, make countless trips from the shoot sight to our gear, keep a firm hand on the family picture lists, and get the shots that the primary photographer doesn’t see all at the same time. There have been times where I’ve had two bags of equipment and two cameras on my shoulders while traipsing through a field of tall grass in 95-degree weather. No big deal, I love it.

The main photographer can set up a shot while talking with the bride and groom, directing them for about 5 different poses, while at the same time I can shoot them from any angle, through trees or tall grass, or as a silhouette from another view point. I am much more creative when I can focus on the shot verses cater to the bride and groom.


There is an art to being a second shooter. I now know the photographer that I assist so well that I am always one step ahead. I know her style of shooting and of how to act in a wedding scene so that I am not a distraction but a necessity. At the end of a wedding, I give her the memory cards that I used, and she takes on everything from there. She culls and edits all of the pictures.

When you’re the head photographer, you have pre-wedding meetings, scheduling, the day of session which includes a lot of pressure, after wedding scheduling, hours of editing, and dealing first hand with brides and sometimes their families. I feel the benefits of being the second shooter is getting more opportunities and angles for creative shots, less pressure, and less time dealing with brides or mother of the brides. The second shooter shows up the day of, shoots all day, and then at the end of the day is done.


Contributor Bio: Deborah Hodgin is a product photographer at KEH and also a second shooter for Ashah Photography.

Website: www.ashahphotography.com


New Value Shipping Option!

$
0
0
We are pleased to announce a new value priced shipping option via U.S. First Class Mail for the accessories and smaller items that we carry in our inventory.


Our new $3.95 shipping option is great for filters, caps, straps, cables, manuals and countless other light weight items.  This is a great opportunity for you to stock up on all the accessories you need in a more cost effective manner.

The new USPS First Class Mail shipping option is available for orders weighing 10 oz. or less, and with a retail value of $100.00 or less.  Available for orders delivered within the United States. 

Qualifying orders will automatically provide the $3.95 shipping option upon checkout (if your order exceeds the weight or retail value requirements, the $3.95 option will not be listed as an available shipping method). 

Ordering from KEH is more affordable than ever!

Roundups

$
0
0
Top Posts of January:
* Making a Monster Print
* Shooting Still Photos for the Movies
* Using Colored Gels for Correction and Effect
* Don't Forget Photos of Your Own Loved Ones
* A Brief Lesson on the Origins of Photography

Updates and News:
* Since February is "the month of love" and we love photography, we'll be posting more featured photos this month! Instead of a "Photos of the Month", we'll be doing a "Photos of the Week" all month long. Submit your photos to our Flickr group to be included in the categories: People, Places, Things, and Camera Gear.

* We just launched a new value priced shipping option for small, light weight items!  Read more about our new $3.95 USPS First Class Mail shipping option here.

Photos of the Week: Places

$
0
0
Since February is "the month of love" and we love photography, we'll be posting more featured photos this month! Instead of a "Photos of the Month", we'll be doing a "Photos of the Week" all month long. 

All images were submitted to and chosen from the KEH Camera Flickr Group pool (join our group!). To view a photographers profile, click on the image to be directed to their Flickr page.
Sulwald im Nebel
Sulwald im Nebel, by Manfred Schroder
Shake Shack, NYC, 8x10 Kodak Tri-X 320
Shake Shack, NYC, by Shawn Hoke
DSC06056
Antietam Battlefield, by Wanda Mounts

Keck on Mauna Kea
Keck on Mauna Kea, by SnowJiang

I lead a charmed life...
I lead a charmed life, by Little Pink Weeble

Marblehead
Marblehead, by Dan Squires
nichols and beal.
Nichols and Beal, by Cara

Untitled
Untitled, by Terrini

Untitled
Untitled, by DhkZ

Morning Glow
Morning Glow, by Paul Vecsei
Coquina Twilight
Coquina Twilight, by John Cothron
Sun up over North Georgia
Sun up over North Georgia, by John


Featured Items of the Month

$
0
0

Links This Month

$
0
0

Photos of the Week: Things

$
0
0
Since February is "the month of love" and we love photography, we'll be posting more featured photos this month! Instead of a "Photos of the Month", we'll be doing a "Photos of the Week" all month long. 

All images were submitted to and chosen from the KEH Camera Flickr Group pool (join our group!). To view a photographers profile, click on the image to be directed to their Flickr page.

Dried Flowers
Dried Flowers, by pthortron
Strobe light - luz stroboscópica
Strobe Light- luz stroboscopica, by domyzio
Frozen stream, Paugusset Forest, CT
Frozen stream, Paugusset Forest, CT, by Ed Steinerts
ice_storm-17
Ice Storm, by Robyn Cox
Untitled
Untitled, by Eastview Photography 
Good Morning!
Good Morning!, by Holly Clark
Chocolate
Chocolate, by 55randomclicks
Untitled
Untitled, by Rachel Carrier
Shuttle Endeavour and 747 Carrier in the Mate-Demate Device
Shuttle Endeavour 747 Carrier in the Mate-Demate Device, by Jeffrey Ross
Untitled
Untitled, by Alexi Hobbs

The Beauty of Vintage Photobooths

$
0
0
From an original photobooth manual

In an era of instant gratification and Instagram, there remains one photographic tool that holds on to its nostalgic charm—the vintage photobooth.  The photobooth—that box with a stool and curtain that we have all been in at one point or another—is as ubiquitous as photography itself.  Both have firmly lodged themselves in our collective memory, as recognizable as white bread or football.  But while one has managed to adapt itself to the charge of progress, the other has held fast to its original intent and in turn become a casualty of evolution.  Both hold important places in the history of art and popular culture.  And while one, photography, has melded and morphed into a form that fits the times, the photobooth is quickly being forgotten to the past.  Those of us who bother with these machines today come at it from varying angles.  Some of us see it as an important art medium, one that should have its own place in the history books.  Others are technicians and mechanics who have a love for the machines the same way some people fawn over classic Corvettes.  Some are purely in it for the kitsch, seeing the machines as a quirky sideshow act.  Regardless, most of us share a little bit of all these things.  And to many outsiders we look like happy fools following a rusting, obsolete metal box full of photo chemicals into obscurity.  This, we can be certain, we definitely are.

A vintage photobooth picture, c. 1950s
I first came to the world of vintage photobooths like most things in life—completely unexpectedly and without a clue as to what I was getting in to.  The whole idea of the photobooth first piqued my interest in a purely photographic way.  The idea of a complete photography darkroom shoved into a metal box the size of a broom closet and operated by a machine with arms and wheels and gears was too much to resist.  Only fellow photographers, with the exception of maybe classic car gear heads, can appreciate my excitement when I was first shown the inside of a vintage photobooth.  When I found out the components of the booth had names such as the Spider Arm, Transmission Assembly, and the AP-10 Unit, that was it.  I was sold.  The fact that the photobooth has been around in one version or another for almost 100 years gave me a feeling of being tied to a history that was rich in context and full of dust and cobwebs.  This booth still used the same basic technology that was implemented in the late 1920s and early 1930s.  In a way, it was like stumbling on an old Egyptian tomb.


The booth has three main components:  electronic, mechanical, and photographic.  The electronics control the firing signals that tell the mechanical components to start, which then activates a series of movements through gears and switches that takes four pictures on a strip of paper and carries it through 14 tubs of chemicals.  Because of the repetitive action of the developing process, the photobooths have earned the nickname “dip-and-dunk” machines.  It truly is a marvel of turn-of-the-century inventiveness.  An entire photography studio, complete with strobe lights and developing darkroom, is crammed into a metal box and electrified.  I remember the Frankenstein feeling I had after completing an overhaul on a decrepit photobooth.  After many hours of trial and error, and endless tweaking and retro-fitting, you hit the switch and four minutes later a little strip of paper spits out with your smiling face on it.  It’s alive!!

L: The delivery unit inside a booth, R: The camera inside a booth
(For more photos from inside of a photo booth, click here)
Tanks inside a photobooth
The most common places to find these old photobooths now are in bars and restaurants.  Long gone are the days when every train station and department store had a photo-chemical, dip-and-dunk booth.  Those have all since been replaced by cheaper and easier to maintain digital booths, or removed entirely.  Today, a handful of businesses around the world are reinstating the photobooths in popular nightspots, places where the nostalgia and amusement factor can be appreciated.  Other photobooths are being given second lives by collectors and enthusiasts who have no business intent at all.  They are simply buying and using the machines either for the historical or artistic merits.  Either way, it is a reality that there are fewer than 300 operational dip-and-dunk photobooths lefts in the world.  The maintenance and upkeep required, not to mention the scarcity of parts and supplies, have made operating these machines a labor of love.  The rest have gone digital or gone native—scrapped into a pile of metal, as it were.

Conceptualization in the photobooth
It’s hard to pin down the exact allure of the photobooth.  Maybe it is the romanticism of the silky black and white images.  Or maybe it’s the eroticism of climbing into a tiny booth with another human being and pulling that red curtain closed.  It could be the paradox that the booth is at once so intimate while at the same time being so sterile and homogenous that people find appealing.  After all it was designed to take a picture the same exact way every single time.  Maybe it’s this clean slate that gives the subject a feeling of spontaneity, as if they can create a whole world all their own.  Any amount of conceptualization can occur inside that tiny space and any artist can explore those possibilities.  Maybe it’s the lack of a (human) photographer that’s enough for otherwise prudent subjects to let loose and show some true colors.  Or it might be because it’s just plain fun.

Fun in the photobooth

For a more in-depth look at the history of photobooths, I recommend checking out Nakki Goranin’s great book, American Photobooth.


Contributor Bio: Russ Goeken is a Savannah-based photographer and collector who manages a handful of cranky dip-and-dunk machines for location and rental use.  

Websites: 
Retro Photobooths 
Obscura Photoworks (you can rent a booth here)
Russ Goeken Photography 


Will You...

An Overview of the Canon L Series Lenses

$
0
0
The "L" lens series is a line of professional lenses for Canon's EOS EF auto focus 35mm SLR and DSLR cameras.  Due to their innovative optical technology and sturdy construction, Canon's L series lenses are popular with both professional photographers and high-end amateurs alike.  Although Canon has not officially defined the "L" designation, there are two prominent explanations as to the meaning behind the "L" name.  It is speculated that "L" stands for either "low dispersion" due to the UD (ultra-low dispersion) glass used in the construction of the lenses, or "luxury" as referenced in Canon's Lens Work III Book.  No matter which way you choose to interpret the "L" designation, both popular definitions are valid in their own right.  Canon utilizes "low dispersion" optical technology in all of their L series lenses, and the high price and noted quality of the L lenses lend themselves to the "luxury" definition.

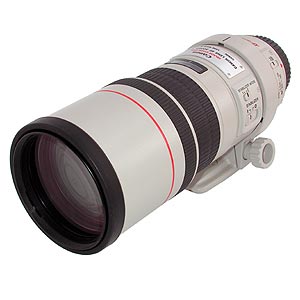
Canon produces the L series line for both zoom and fixed focal length lenses.   The L lenses will also work on all film and digital Canon EOS cameras.  The red ring around the end of the lens barrel identifies all Canon L series lenses.  Some of the lenses have a black finish, but the majority of the telephoto and super telephoto L lenses come in Canon's famous white finish (take a look at the gear of the professional photographers the next time you watch a major sporting event and you will be sure to see many white Canon L lenses).
Canon 300mm L Lens w/ Signature Red Ring & White Finish
Canon incorporates a combination of optical innovation and technology with rugged design in the production of their L series lenses to differentiate them from other lenses.  Canon L lenses also feature wider maximum apertures than other lenses, as this is highly desirable for photographers shooting in low lighting conditions.  This combination of factors is the basis behind the high-end quality and reputation of the L series lenses.  For instance, Canon uses fluorite crystals in many of the L series lens elements.  Fluorite is a great material for photographic lens elements because it transmits UV (ultraviolet) and IR (infrared) light well, has a low index of refraction and has a low rate of dispersion.

Having a low index of refraction is desirable because the less the light refracts (or bends), the sharper the focus.  The sharpness of an image is also affected by the convergence of light through glass because it breaks the light into colors with different focus points.  This is known as chromatic aberration, and using a fluorite lens element helps to reduce this effect by allowing for a lower rate of light dispersion. 

Chromatic Aberration in a Normal Lens vs. a Fluorite Lens
Despite the benefits of using fluorite for the lens elements, it can be very cost restrictive due to the rarity and delicate nature of working with the material.  This is also one of the contributing factors for the high price of some of the Canon L series lenses.  To counteract the costly nature of using fluorite, Canon developed UD (ultra-low dispersion) and Super UD (ultra-low dispersion) glass.  It is much less cost restrictive using UD glass rather than fluorite to manufacture camera lenses.  Although not as optically superior as fluorite, UD glass is very similar in that it has a low rate of refraction and dispersion.  The performance of UD glass is better than normal optical glass, and much more cost effective than fluorite.

Canon's Super UD glass is optically superior to standard UD glass, and creates results similar to fluorite.  Super UD glass is used in many Canon L series lenses and in some instances, a combination of Super UD and fluorite is used to create several high performance lenses.  This optical technology is important because with the perpetual development of higher resolution digital cameras, the greater the demand for an optically superior lens.
Canon 24-70mm L Lens w/ Signature Red Ring & Black Finish
Another contributing factor in the optical innovation of Canon's L series lenses is the use of aspherical lens elements.  Aspherical lens elements are critical in producing sharp images because of the curved nature of a spherical lens.  Spherical aberration occurs when light passes through glass and converges at different focus points.  Eliminating the curve of a spherical lens element allows for light to converge into a single point, thus resulting in a sharper image.

Spherical Aberration in a Normal Lens vs. an Aspherical Lens
In addition to optical performance, Canon employs the use of various coatings on the lens elements to achieve premium image quality.  SSC (Super Spectra Coating) is multi-layered coatings created by Canon to reduce lens flare and to faithfully reproduce color balance.  SWC (Subwavelength Structure Coating) is an anti-reflective coating that serves to reduce lens flare.  Canon L lenses also have a fluorine coating on top of the anti-reflective coating to aid in the removal of dirt from the lens.  The fluorine coating technology works to repel oil and water from the lens, resulting in the elimination of using a cleaning solvent.  The special nature of the coating also creates a smooth lens surface, thus preventing scratches.

Robust construction is yet another important factor in the quality of the Canon L series lenses.  It is extremely critical for photographers to have a lens that can withstand adverse shooting conditions such as rain, wind, dust, dirt, and other environmental challenges.  Canon utilizes rubber sealing at interface areas and on moving parts to protect against dust and moisture.  Canon's L series telephoto and super telephoto lenses also feature a white finish, which aids in the prevention of heat inside the lens.  The white lens surface reflects the sun, thus helping to keep the lens cool in warmer temperatures.
Canon L Lens w/ Rubber Sealing
So what does this mean for the consumer?  Superior optical performance and rugged lens construction are necessary for the work of a professional photographer.  The optical technology of the lenses aids in the delivery of high quality images with great color, contrast, and sharpness.  Canon's L series lenses also meet the demanding requirements of rigorous shooting conditions so the photographer can focus on capturing the subject matter at hand, rather than worrying about performance of the equipment.

- L.M.
To shop KEH's selection of Canon L lenses, clickHERE.

For more information on Canon L lenses, check out the following websites:
* Canon Camera Museum  
* Canon Professional Network Infobank

Photos of the Week: People

$
0
0
Since February is "the month of love" and we love photography, we'll be posting more featured photos this month! Instead of a "Photos of the Month", we'll be doing a "Photos of the Week" all month long. 

All images were submitted to and chosen from the KEH Camera Flickr Group pool (join our group!). To view a photographers profile, click on the image to be directed to their Flickr page.

Mood
Mood, by Kevin O'Mara
About to Explode
About to Explode, by Holly Clark
Hugs...
Hugs, by Sonja Stone
Independent
Independent, by Heather Stockett
her mimi's granddaughter.
Her Mimi's granddaughter, by Kate Parker
Aunt and Niece. Charleston, IL. 2012.
Aunt and Niece, by Micah McCoy
Untitled
Untitled, by Wayne Steveson
Kara
Kara, by Paul McEvoy
New Portra 400_ Speedlights
New Portra 400_Speedlights, by Cory Shannon
The Boss
The Boss, by Peter Dybowski
David
David, by RV Henretty-Jornales
Off the Mirror
Off the Mirror, by David Gutierrez
Untitled
Untitled, by ygalyk
Blue
Blue, by Istvan Pinter
Dancer In A Window
Dancer In A Window, by Laura Richardson

KEH's Most Wanted

$
0
0
Featured below are a selection of KEH Camera's "most wanted" items of the month.  We want to pay you top dollar for your Pentax, Canon and Nikon fixed focal length lenses.


Nikon Manual Focus 105mm f2.5 AIS Telephoto Lens

In addition to the items featured above, we are actively seeking the following lenses:

* Pentax Auto Focus SMC FA Fixed Focal Length Lenses (particularly 20, 24, 28, 35, 50, 85, 100 & 135mm)

* Pentax Manual Focus SMC-A Fixed Focal Length Lenses (all focal lengths)

* Canon EOS L USM Fixed Focal Length Lenses (particularly 15, 35, 50, 100, & 180mm)

* Nikon Auto Focus Fixed Focal Length Lenses (particularly 50, 60, 80, 85 & 105mm)

* Nikon Manual Focus AIS Fixed Focal Length Lenses (all focal lengths)

To sell any of the above featured items (or if you have other gear you'd like to sell), please contact us via email or give us a call at (770) 333-4220 or (800) 342-5534.  We want to buy your clean, used photographic equipment and put some extra cash in your pocket!

Make More Money With Your Photo Business: Hire An Employee

$
0
0
As good business owners, we try to save money where we can.  Occasionally, we have found that certain things we cut back on to save money ended up resulting in missed opportunities to make additional income.  Refusing to pay an employee to save money may be one of those cases for you, like it was for us.  By hiring an employee to help with our photography and videography businesses, we've managed to consistently bring in more money each month.

Good To Better Or Bad To Worse
Before you jump in feet first and hire an employee right away, you need to take a hard look at your numbers.  I recently met with a photographer who was considering going full-time with his photo business.  After looking at the profit for a typical session and factoring in the cost for material expenses and time, he was making around $8 an hour.  Hiring an employee at $10 an hour so you can get more work at $8 an hour just doesn't make sense.  Similarly, it wouldn't make sense to hire an employee if you don't have extra paying work to do yourself.

Would Somebody Get The Phone?
The most apparent benefit we saw when we hired an employee was that our voicemails and emails were getting returned in a timelier manner.  It was particularly evident during our busy season, as it was pretty embarrassing how long it took us to get back to clients.  Before we had an employee to respond to clients, we were occasionally losing business because they got tired of waiting for a response and found another photographer.  Not only were we missing out on additional business, we weren't helping our professional reputation by leaving customers waiting.


Cleaning Up Pretty Nice
When you've got 100 things on your to-do list for the day, it's easy for some of the "less important" tasks to fall through the cracks.  For me, the less important stuff was presentation of the client deliverable.  I know what you're thinking, and yes, I've heard the experts talk about the importance of presentation.  It just ended up getting ranked lower than other equally important tasks on my list.  After hiring an employee, we saw an immediate improvement in the presentation of pictures we were delivering to customers.  Hiring an employee can also result in a cleaner studio.  With the reduced stress, we were even able to look more presentable to clients ourselves as less frazzled business owners.

Pursuing More Business
Networking with other business professionals can be a good way to increase business, but it's often hard to find the time to do the face-to-face interaction you need with networking.  Bringing on an employee may reduce your workload enough for you to consider adding a few more networking opportunities to your calendar.  Depending on how confident you are in your new hire, you may even think about letting your employee do some networking for you.

Don't Abandon Diligence
You've worked hard building your business.  Getting an employee to help you out doesn't mean you get to just sit back and relax.  Stay on task with growing your business.  No employee will ever work harder than a boss, so don't set a bad example.  There's still plenty to do.

Wrapping Up
Hopefully hiring an employee will let you enjoy your job more, make your customers happier and make your business more money.  It's certainly not a decision that you should take lightly, but it may help you turn a corner with your business.  Make sure to run the numbers with your accountant and consult your lawyer before making a final decision about whether now is a good time for you to hire.  Best of luck with growing your business!


Contributor Bio:
TJ McDowell is the owner of the Saint Louis based video production company Gateway Commercial Media.

Photo Website: http://www.LarissaPhotography.com
Wedding Videos: http://www.TJsVideoCafe.com

If you enjoyed this article, be sure to check out TJ's previous guest posts on 5 Reasons You're Not Booking Photography Sessions, and Ways Photographers Are Wasting Money on Marketing.

Photos of the Week: Camera Gear

$
0
0
Since February is "the month of love" and we love photography, we'll be posting more featured photos this month! Instead of a "Photos of the Month", we'll be doing a "Photos of the Week" all month long. 

All images were submitted to and chosen from the KEH Camera Flickr Group pool (join our group!). To view a photographers profile, click on the image to be directed to their Flickr page.

Canonblad
Canonblad, by LostNClueless
What's in your bag, 26 September 2012
What's in your bag, by Robb Hohmann
0000061
0000061, by Agus Wahyudi
herold 40
Herold 40, by Sequoia
Nikon FM2n on 4x5
Nikon FM2n on 4x5, by Bruce Garner
Hello Film
Hello Film, by Chinwe Edeani
Minolta XGM
Minolta XGM, by Viisshnu Vardhan
Rollei 35 S Neutral
Rollei 35 S Neutral, by Jamie Zucek
Pentax MZ-L with SMC Pentax-FA 43/1.9 Ltd.
Pentax MZ-L, by Colton Allen
pentax 645 shoots pentax 6x7
Pentax 645 shoots Pentax 6x7, by Fabio Ventura
Untitled
Untitled, by Jordan Parks
_DSC1509
Untitled, by Jason Philbrook
The Legendary Blue Graflex
The Legendary Blue Graflex, by Wayne Stevenson
Super Graphic
Super Graphic, by bhophotos

Trial and Error: Tips for Experimental Shoots

$
0
0
I don’t know about you, but for me, experimental photo shoots are an important part of what I do. I use them to challenge myself, learn new things, master skills and equipment, and gain insights into how things work. I also have a bit of fun along the way and sometimes produce a portfolio worthy photo too. I do an “experimental” or “test” shoot every time I get a new piece of photo gear, when I want to try out a new lighting set up, and any time I get some crazy idea in my head and want to work with a new material.

Although one of these photo shoots may just be a “test” shoot, I still want to get the most from it, and want you to get the most from yours too. Here are a few things I’ve learned from doing them, along with examples from my most recent experimental shoot.

Have A Vision
While it’s sometimes fun to just “play” with no set agenda while photographing, it’s good to go into one of these experimental shoots with a set vision. What are you trying to accomplish? What do you want the final product to look like? Having a goal in mind will help you know what to change to get to where you want to be.

Example: I had an idea in my head that I wanted to shoot through ice. Living in the south, it was a pretty long shot that some magical large piece of ice would just appear, so I knew I had to make one. I decided I wanted to figure out how to make a sheet of ice that I could shoot a clear portrait through, while still keeping some texture in the ice sheet. I didn’t want to have to add any fancy tricks or filters in the editing process, but wanted to capture it straight out of the camera. After I had made the sheet, I was then going to have to figure out how to light it. I had a pretty clear picture in my head how I wanted the final images to turn out, and I came pretty darn close to that vision.

Do Your Research
Spend some time researching your topic, whether it is a new piece of equipment, a lighting set up, or new materials, before beginning to put your new knowledge to the test.

Example: I spent some time reading up on how to make clear ice. If you look at ice cubes that come out of your refrigerators ice machine, they are very cloudy, and more on the white side then clear side. So, I read up on different ways to achieve clear ice, both scientifically, and from people who had already experimented with it.

Test ice pieces, round 1

Do A Preliminary Test
Even thought the point of your “test” shoot is to experiment, I prefer to do a pre-test test with the item or material before I have a person in front of me. This way, it doesn’t waste any unnecessary time during the real test shoot and I can work out a few kinks in the first test before moving on to the real one.

Example: I first created 3 small test ice blocks. One with frozen tap water- it turned out cloudy as predicted. One with frozen distilled water- partially cloudy. And one with boiled tap water with a bit of blue food coloring in it- fairly clear but the blue coloring concentrated in the middle and didn’t produce an even blue throughout the whole piece of ice. I then shot a toy horse through the blocks to see to what extent I could see through each one.

Don’t Do A Test Shoot On A Client
This should be a given. If you don’t really know what you’re doing, don’t do it for a paying client. Ask a friend or family member to be your sit-in model for your experiment.

Model holding 1st test ice piece (fail), round 2

Be Prepared
Just like any paid shoot, you should always be prepared, especially if another person is involved. If you’re shooting a still life and it’s just on your time, well then being prepared is up to you, but again, it’s not nice to waste someone else’s time because you haven’t thought ahead. Have your equipment ready and set up, have all of your materials readily accessible, and have a game plan.

Example: Being prepared for the ice shoot was especially important because I had to work fast- my material after all would be melting away the entire time we were using it. For my official test shoot, I prepared five large sheets of ice. Each one was made a little differently, in the hopes that we would have at least two good sheets to work with, and have some back ups. Because I knew it would be cold, I prepared the model for what to expect, supplied her with gloves (since she was going to have to hold the ice sheets), had an assistant running the ice sheets back and forth to me and the freezer, and had a towel on the models lap for the melting ice droplets that would land on her.

Have A Backup Plan
This is more essential when you have another person involved like a model as well. If your plan doesn’t go anywhere near what you had wanted, is there something else you can do?

Example: My plan was to just be shooting the face, but since I had no idea how these larger sheets of ice were going to turn out, I asked the model to bring clothing for a full length shot and had a backup idea in mind incase my first idea didn’t work. I could then at least take another type of picture for her troubles that wouldn't be relying on an experimental aspect.

Keep An Open Mind and Expect Problems
With any kind of experiment, there’s always a chance that things could not go as you had imagined. Even though you may be prepared and have done your research, expect unforeseen problems, roll with them, and adapt.

Example: Although I had done the first set of ice tests, and done my research on "making clear ice", my final ice sheets were on a much larger scale. I ran into multiple issues that we had to work around with the final pieces. One sheet that was made in a seasoned baking pan had came out with some oily seasoning and soap particles in the water. Another that we made in a disposable plastic container came out with the brand name Glad on the ice, which was very visible in the images. Because of the size and the rate at which the sheets froze, we also had other problems such as large cracked “bubbles” in the center of some of the sheets. Oh yeah, and the frozen gelatin sheet we tried, lets just say “eww” and leave it at that. So with only one really useable sheet of ice, and a few not quite useable, we had to figure out an on-the-spot treatment to make the sheets useable. And luckily, we did.

A final shot from the "ice" experimental shoot


Photos and article by Jenn Fletcher, BlondeShot Creative

Roundups

$
0
0

Top Posts of February:
* The Beauty of Vintage Photobooths(see the mechanics inside one!)
* An Overview of the Canon L Series Lenses
* Make More Money With Your Photo Business: Hire An Employee
* Trail and Error: Tips for Experimental Shoots


Updates and News:
* We're currently seeking contributing photographers/writers for the blog. If you have a unique and creative topic you'd be interested in sharing with our readers, send us an email at kehcamerablog(at)gmail.com.

* This months theme for "Photos of the Month" is Animals. We'll also be doing a second special edition  with the theme of People with Camera Gear. Submit your photos to the KEH Camera Flickr Group and we may choose one of your images to feature!

* Incase you missed the announcement last month, be sure to read about our New Value Shipping Option! This is perfect for when you just need something small like a filter or cap, but don't want to pay  the usual shipping rate.

* Also, you may want to stay tuned for a possible little giveaway coming up soon :)


Alternative Print Surfaces: Metal

$
0
0
There are many alternatives to having regular paper prints made. The most common these days is probably canvas prints. But other materials are still fair game. We have previously talked about transferring images onto other surfaces such as canvas, glass, and wood. Today I want to talk a little bit about the option of having prints made on metal. Now, you can always transfer your images yourself onto metal via this technique. But, for the following examples I used a print service to do it for me. The end result is different then a transfer would be. There are numerous places where you can get your images printed on metal, but the following examples were made by Bay Photo. (*This post is in no way associated with or endorsed by Bay Photo, it’s just where I chose to get my prints made and where I'm using as an example service.)

Bay Photo states,MetalPrints represent a new art medium for preserving photos by infusing dyes directly into specially coated aluminum sheets.Because the image is infused into the surface and not on it, your images will take on an almost magical luminescence.”

They offer four finishes, multiple shape and corner options, and multiple hanging options for metal prints. Bay Photo also offers a sample kit so that you can get the same photo printed with all four of their finishes to see which you like before purchasing a large metal print in a finish you may be unfamiliar with.

(The below images are scans of metal prints. Keep in mind that the glossy and matte finishes are lost on the computer screen, as are some of the true color and luminescent qualities of the finished prints)


The two sheer finishes look the most like what you would think of when someone says, “metal print”. The texture and detail of the metal come through the image and finish, especially in the lighter/brighter areas of the image.

The sheer glossy has a high gloss coating that is fairly reflective and mimics a glass top. When you change your viewpoint or slightly tilt one of these prints, it almost has a 3-dimensional feel to the image.


The sheer matte doesn’t have that glass-like shine, but still has some shine from the metal itself coming through.

The high gloss and satin finishes look much more like traditional prints than the sheer finishes do, but are still noticeably printed on metal when held. They do however show more detail in the image, since the detail of the metal doesn’t show through. The satin finish is fairly matte, and the high gloss is similar to the sheer glossy in that it is very reflective and glass-like. 

Similar to paper prints, I would say the colors (if using a color image) pop the most in the two glossy surfaces, both the sheer gloss and the high gloss.

So why would you want to have your images printed on metal instead of paper? Bay Photo offers this explanation, “While photo papers have fantastic image stability, Xenon Light Stability Testing results show that the image stability of MetalPrints is 2 to 4 times the image stability of traditional silver based photo papers.” Because it’s so durable, you can also forgo the mattes and glass- the “ultra-hard scratch-resistant surface is waterproof/weatherproof and can be cleaned easily with any commercial glass cleaner.” Another reason may be that the subject matter of the image matches the material, or maybe you’re just looking for something different. Either way, it’s always fun to explore new materials. 

The original digital image shown for color and texture comparison to the metal prints

And P.S.- For the super photo geek, camera fanatic, or as an idea for a sign for your photo business, they also offer your metal prints in the shape of a camera!


- Article and photos by Jenn Fletcher, BlondeShot Creative

Viewing all 304 articles
Browse latest View live